Tuesday, January 24, 2012

Pizza Break


Arugula Salad White Pizza

To avoid the January doldrums, last week we varied our menu a bit and decided to make our own pizza. While many of you probably eat pizza often, pizza is not on our usual menu list, so this was a welcome break. I was inspired by Country Living's Everything Guide to Pizza. We like a thinner, yeasty tasting dough and this recipe fit the bill. It's a perfect dough to make when you're home for the afternoon, so you can monitor the dough's rising.


 Homemade Pizza Dough
Ingredients:
  • 1/4 cup(s) warm water, for yeast mixture
  • 1 1/2 teaspoon(s) sugar
  • 1/2 teaspoon(s) active dry yeast
  • 3/4 cup(s) warm water, plus more if needed
  • 2 tablespoon(s) olive oil
  • 1 1/2 teaspoon(s) cider vinegar
  • 2 1/2 cup(s) all-purpose flour
  • 1/4 cup(s) whole-wheat flour
  • 1 teaspoon(s) kosher salt
  • Cornmeal, for dusting
Directions:
  1. In a small bowl, mix 1/4 cup warm water, sugar, and yeast. In a glass, mix 3/4 cup warm water, olive oil, and cider vinegar.
  2. In a large bowl, combine all-purpose flour, whole-wheat flour, and salt. Create a well and add liquids from Step 1.
  3. Using a wooden spoon, stir, bringing in flour from the edges, until a soft, shaggy dough forms. Add 1 to 2 tablespoons more water, if needed.
  4. On a lightly floured surface, knead dough — using the heel of your hand, stretch dough away from your body, then fold it back onto itself — until supple, about 10 minutes. (P.S. I was impatient and only kneaded for 5 minutes and it turned out great!)
  5. Form dough into a ball, lightly oil, and place in an oiled bowl. Cover with a damp towel and let dough rise until doubled in size, about 2 hours.
  6. Using a knife, divide dough in half. Pat 1 half into a disc. Using a rolling pin, flatten disc into a 1/4-inch-thick 12-inch circle. Repeat or refrigerate remaining dough up to 1 day.
  7. Transfer dough to a pizza peel or cookie tray that's been liberally sprinkled with cornmeal (to prevent the dough from sticking).
  8. Top dough with a thin layer of sauce, cheese, and desired toppings.
  9. Slide pizza onto a preheated pizza stone or the cookie tray on to the lowest shelf of the preheated oven. Bake until crust is golden, 8 to 10 minutes.
Here are the photos for the making of the dough- they do help.


I used my homemade pasta sauce that I had on hand, but this recipe sounds delish, especially if you use fresh tomatoes from your garden in the fall.

Roasted Tomato Sauce


Ingredients:

  • 2 1/2 pound(s) plum tomatoes, quartered
  • 1  yellow onion, diced
  • 1  green bell pepper, cut into 1-inch pieces
  • 1  red bell pepper, cut into 1-inch pieces
  • 1/2 cup(s) extra-virgin olive oil
  • 1 1/2 teaspoon(s) kosher salt
  • 1/4 teaspoon(s) crushed red pepper
  • 1/4 cup(s) chopped fresh basil
  • 2 teaspoon(s) fresh oregano
Directions:
  1. Preheat oven to 375 degrees F. In a 9- by 13-inch baking pan, toss together tomatoes, onion, bell peppers, oil, salt, and crushed red pepper. Roast for 1 hour. Remove pan from oven and fold basil and oregano into vegetables. Cook for 30 minutes more.
  2. In a food processor, blend vegetables until pureed. Use immediately, refrigerate for up to 2 weeks, or freeze.
 Sausage Mushroom Pizza

Potato Pesto Pizza

We made the Sausage Mushroom and Arugula Salad pizzas- yum! Doesn't the Potato Pesto pizza sound good? I might try combining potato and buttermilk blue cheese instead. Here are a few other combo ideas:

Shredded rotisserie chicken tossed with barbecue sauce
Radicchio drizzled with honey 
Anchovy paste and sliced green olives
Fig jam, prosciutto, and Taleggio
Caramelized onions with avocado and chorizo
Crispy fried calamari and jalapeño rings
Ricotta with sliced peaches and plums
Sautéed celery with blue cheese
Roasted cauliflower and capers

What are your favorite pizzas?
[via]

Monday, January 23, 2012

All Aglow

It's usually when I've been working on a wedding or special event that I am reminded of the importance of good lighting. Whether in a tent or one's home, it is the key ingredient in setting the mood and creating the ambiance you want. Obviously good design is important, but if the lighting isn't right, the design may matter little.

I've collected a few images of fixtures that inspire me...

 A beautiful Murano glass chandelier

A simply elegant gilt chandelier

Muriel Chandelier by Oly  The cast resin "bubbles" will cast fun shadows.

Love the roughness of the stone wall compared with the ornate crystal chandelier

Fun and funky

Arctic Pear Chandelier by Ochre

Seed Cloud Chandelier by Ochre

Swarovski crystal chandelier   Its color is to-die-for!


This is the "before" look of a tent wedding designed by Pieter Bouterse Studio; the "chandeliers" were a combination of tiny lights and lucite rods. They were absolutely magical with the tent all dressed up for the party.
 

What are your preferences for lighting your own home?

[1,2,3,4,5,6,7,8]

Saturday, January 21, 2012

Oozing Creativity

Creativity simply oozes out of Sarah Illenberger's genes.
One look at her creations and one can see that Sarah looks at things in her own unique way.  Sarah's parents were jewelers by trade and gave Sarah her own workbench at age seven to explore and create (How cool is that!).

Sarah Illenberger's  studio is in Berlin, where she designs works ranging from organic sculptures to ad campaigns for commercial clients. An attempt to categorize her work proves to be difficult.

Sarah's innovative concepts are all carried out by handwork. She creates abstracts out of everyday materials, manipulating them in unexpected ways, as you will see below. Her sense of humor shines through each one.


RUBINE

ARTYSCHOKE

GRANATE

VÖLLIG WEICHGEKOCHT

ZWIEBEL

BIRNE

CHILLIS

MCFOREST

MELONCHOLIE

TRENDGEMÜSE

POMELO

Sarah Illenberger in her studio

Visit Sarah Illenberger's studio here.

[1-11, 12]

Friday, January 20, 2012

A Lovely Lady

Last week, I came across this painting while doing research for a post on Highclere Castle.
This is Catherine Wendell, the 6th Countess of Carnarvon. She married the 6th Earl of Carnarvon, Henry George in 1922. They divorced in 1936.

For some reason, I find this painting to be hauntingly beautiful.


Maybe it is its tone-on-tone effects with just strategic pops of color. 
Or the pretty woman. 
No matter, just enjoy!
(If anyone knows, please tell me who the artist is.)

[via]

Thursday, January 19, 2012

About Those Lacquered Walls

The Spa in the Royal Mansour in Marrakech

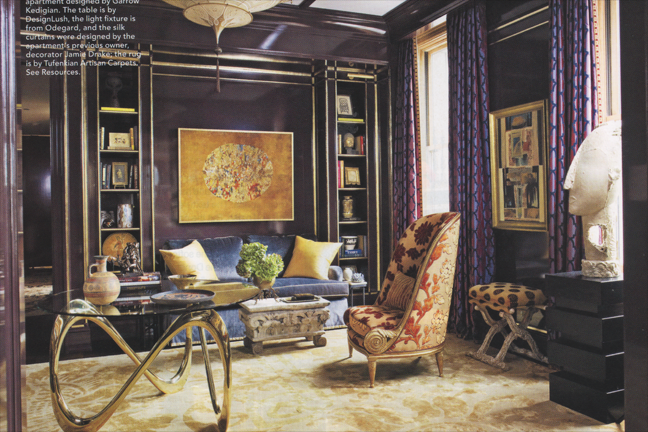
Lacquered walls continue to be an enduring design element. Their beauty is unquestionable; their creation is a dedication to perfect prep work. While describing the wall preparation yesterday for the The Art of Scribbling mural, Wall Drawing #1268:Scribbles: Staircase (AKAG), seen here, I described the numerous steps that were taken to make the walls as smooth as possible. Besides the sanding and layers of skim coat plaster, the walls still need to be primed and painted with many layers of paint to obtain the smooth sheen that you see in the following examples.
The light blue color is nice to see in the world of lacquered paint finishes- dark colors are seen more often.

Kudos to the patient team who painstakingly painted these perfect cabinets.

The walls above and below are actually Venetian plaster. Instead of numerous layers of paint, most often three or four layers of plaster are skillfully applied, followed by a protective wax layer and buffing.


The lacquered, taupe door has been accented with a gold leaf trim.

A lovely shade of gunmetal blue graces this lacquered door.

Lots of texture contrasts in a Jeffrey Bilhuber designed study.

I love the way the deep aubergine high gloss walls are accented by bookcases trimmed with gold leaf.

For more information, view here.
Do you have any lacquered walls in your home? 
Are they only for the few due to their incredible amount of labor?

[1,2,3,4-5,6,7,8,9]

Wednesday, January 18, 2012

The Art of Scribbling

Imagine... you were just hired to work on a project where all you had to do was scribble. Yes, scribble, with a pencil. OK so far. (I mean, how hard can it be?) You report in the first morning, a little curious about where this scribbling is to be done and a little smug at landing this job. (I mean, how hard can it be?) You meet the boss and your fellow artists in the lobby of the building. That building is the Albright-Knox Art Gallery in Buffalo, New York, in the section where the two museum buildings meet. The boss casually waves his arm and says that this is where you'll be working. Everyone looks around, puzzled, thinking "Where, exactly?" He then clarifies the situation, stating that all of the 2,200-square-feet of the lobby walls are your canvas.  
Whoa. 


This is how the mural, Wall Drawing #1268:Scribbles: Staircase (AKAG), was started, just as you see above. The mural was designed by artist Sol LeWitt in 2006, but he passed away in 2007, before it was actually started. Under the direction of five master draftsmen from LeWitt's studio, the mural was completed in 2010.

Because of the very public location and importance to the museum and the precise substrate needed to accurately complete the mural, the walls needed to be extensively prepared. After the large scaffold was erected in the eight foot stairwell (with two viewing windows for guests to peek into built within the structure of the scaffolding), the wall prep included: "seven layers of sanding, two coats of plaster skim coat, two coats of oil-based paint primer, and five to ten coats of latex paint, with a total of nineteen days of drying in between layers."**  
(Hmm- that is actually the same prep needed for a lacquered wall...)


Just think of the amount of black dust that must have been produced by covering the wall in graphite! The entire twenty-six foot scaffolding was wrapped in plastic; the artists entered the protective plastic “cocoon”  by walking on Sticky Mats catch the dust from their shoes.

Before his death, LeWitt left simple instructions: 
Line. Continuous gradation and feel of steel.
 
So, 16 artists worked (scribbled) 7 hours a day for a total of 5,026 hours over 54 days using 1,717 pencil leads. They had to work in sections, completing each one before moving on. Entire walls were “gridded out” to match LeWitt’s plan using common household thread.When adjacent sections were completed, the paper was removed and the joining edges were touched up. The mural was varnished before the scaffolding was removed, not only to protect it, but also to darken it and give the surface of the drawing a matte finish.      


To have worked on this mural, I imagine that each artist had to crawl inside his head and dig deep to be able to scribble for that long of a time, day after day. They probably saw different shapes in their scribbles with many emotions surfacing throughout the day. I don't think I could have done it myself.


What a beauty!


Cheers to the artists for just earning the Best Mural Award given by Wallpaper magazine in their February, 2012 issue.

The artists were Darren Adair, Takeshi Arita, Kyle Butler, Roshen Carman, Andrew Colbert, Cynthia Cui, Katharine Gaudy, Aviva Grossman, John Hogan, Ani Hoover, Gabriel Hurier, Roland Lusk, Amanda Maciuba, Allison Midgley, Alyssa Morasco and Joshua Turner.

Visit here for fascinating reading at Albright-Knox Art Gallery's blog on the wall in progress.
[**via]


Post Script

I just ran across the work of Il Lee- along the same line, but Mr. Lee's medium is the ballpoint pen. 
Some pretty amazing works, wouldn't you say?


[via] 

LinkWithin

Related Posts Plugin for WordPress, Blogger...